Design of Experiments (DoE) is a powerful engineering technique that allows us to understand the influence of multiple factors on a process and identify their optimal settings. However, even the best-designed experiment can yield misleading results if the team fails to properly prepare the process in advance.
Proper preparation — ensuring stable and consistent input conditions — is crucial for the success of DoE. Early works by statisticians like R.A. Fisher already emphasized that thorough planning and thoughtful execution before starting an experiment help avoid common data analysis pitfalls.
In other words, time invested in preparation pays off in the form of reliable results and accurate conclusions.
In this article, I present a practical step-by-step guide on how to prepare a process for conducting a DoE experiment. Special focus is given to ensuring consistent input conditions before starting DoE, which includes controlling input variables, using quality tools (SPC, Poka-Yoke, checklists), and eliminating uncontrolled variation.
I will also highlight the most common mistakes made before launching an experiment and their consequences. At the end, you will find a DoE Readiness Checklist to ensure that nothing has been overlooked.
Common Mistakes Before Running a DoE
Before discussing the preparation steps, it is essential to understand the typical mistakes that often occur in practice before launching a DoE experiment.
Here are the most common ones and their consequences:
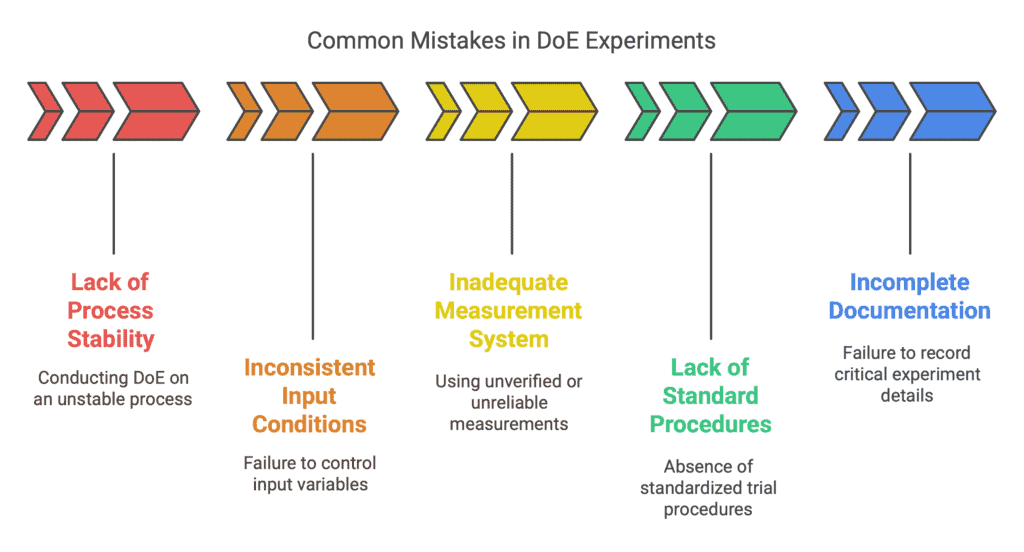
Lack of Process Stability Before Conducting DoE
One frequently overlooked mistake is conducting a DoE on a process that is not stable or repeatable. If the process changes due to random or special causes (e.g., machine breakdowns, unstable settings) during the experiment, the results will be heavily affected by noise.
Consequence: It becomes difficult to distinguish the effects of the studied factors from random variations. This can lead to false conclusions — either incorrectly declaring that no factors are significant or misidentifying causes — when in fact, the core problem was process instability.
Inconsistent Input Conditions
Another common issue is the lack of control over input variables not included in the experiment. For example, if you are studying the effect of welding parameters on joint strength but at the same time use materials (sheets) from different batches with varying quality, you introduce uncontrolled variation.
Inconsistent raw materials, different operators executing trials differently, or changing environmental conditions (such as temperature or humidity) can all mask or distort the effects of the planned factors. Again, this leads to incorrect or inconclusive results.
Inadequate or Unverified Measurement System
DoE relies heavily on collected data, so measurement quality is critical. A common oversight is failing to verify the measurement system before the experiment.
Uncalibrated instruments, low resolution of measurements, or significant variability between different operators (lack of repeatability and reproducibility) result in unreliable data. As a result, even if the process reacts to factor changes, it might not be detected statistically — or worse, apparent differences could be observed where none actually exist.
Lack of Standard Procedures and Human Error Control
Human and organizational factors are often underestimated. Without standardized procedures for conducting trials, checklists, or mistake-proofing methods, human errors can easily creep into the experiment.
Example: An engineer might accidentally set the wrong factor level or skip a process step if there is no clear checklist for each trial. Such errors cause anomalies in DoE results that are difficult to explain afterward. In the worst case, the entire experiment must be repeated, wasting time and resources.
Incomplete Documentation and Supervision of the DoE
Sometimes, due to haste, experiments are carried out without complete supervision and without recording critical information.
If we don’t thoroughly document conditions for each trial — including date, time, operator, material batch number, etc. — we lose the ability to trace anomalies later.
Missing data makes analysis harder and may cause critical observations to be overlooked. For instance, if trials done on Monday mornings yield different results compared to Friday afternoons, it could hint at operator fatigue or material supplier change.
Step-by-Step: Preparing the Process for a DoE Experiment
Preparing for a DoE experiment can be divided into several key stages. The steps below follow a sequential order, although in practice some activities can be performed in parallel. The most important thing is that the person responsible ensures all aspects are addressed before launching the first planned DoE trial.
Step 1: Clearly Define the Goal, Response, and Scope of the Experiment
The first step is making sure we know exactly what we want to achieve and investigate.
Define the experiment’s objective clearly (e.g., identifying welding process settings that maximize joint strength while minimizing variability).
Specify the output variable (response) that will be measured as a success criterion — ideally a continuous and precise measure, not just a pass/fail result.
Determine the scope and planned input factors (independent variables) along with their levels.
At this stage, it’s also worth consulting with process experts and reviewing historical data to choose meaningful factors and levels.
You should also decide which potential disturbing variables you will control or keep constant. Every process has many inputs, but in DoE, we focus only on selected factors — the rest must be stabilized.
Prepare a list of such nuisance variables (e.g., material type, operator, machine, time of day, etc.) and plan how you will ensure they remain constant during the experiment (details on this in Steps 2–3).
Good planning is essential, but here we will mainly focus on the physical preparation of the process for testing.
Step 2: Ensure Process Stability and Repeatability
Before we start modifying any factors under DoE, the process must be stabilized.
This means that under normal (current) settings, the process results are repeatable and under statistical control.

The best practice is to apply Statistical Process Control (SPC) on key parameters or process outcomes before running the DoE.
SPC — through control charts and variability analysis — helps confirm that the process behaves consistently (without unpredictable deviations).
If control charts indicate special causes of variation (points outside control limits, trends), these problems must be solved before the experiment. Otherwise, DoE will be performed on unstable ground.
In practice, ensuring stability includes:
Calibration and Verification of Machines and Instruments:
Ensure all equipment involved in the process (presses, injection machines, ovens, robots) is calibrated and working correctly. Even small calibration drifts (e.g., a miscalibrated temperature sensor or unstable compressor pressure) can introduce errors. Plan calibrations ahead so they are up-to-date during DoE.Standardization of Operations and Staff Training:
If operators are involved in conducting trials, train them thoroughly on the experimental procedure. Ideally, the same person or a fixed team should perform all trials to minimize individual differences.
If this isn’t possible, create detailed work instructions so everyone follows identical steps. Operator qualification ensures they know what to do and why, minimizing risks of error.Stable Environmental Conditions:
Many processes are sensitive to environmental conditions (e.g., temperature, humidity).
Before DoE, ensure the production environment is within an acceptable range. If complete control isn’t possible, monitor conditions and account for them (e.g., perform experiments in short time windows or block trials across different conditions).Preliminary Stability Checks:
It’s a good idea to perform a series of trial runs (without changing factors) to assess baseline process variability.
For example, produce several identical parts consecutively and measure the results — if the spread is small and predictable, the process is ready. If not, investigate and stabilize.
At the end of this step, the process should be “locked” — holding parameters and results consistently — often referred to as the steady-state or statistically controlled condition.
Step 3: Maintain Consistent and Controlled Input Conditions
Once the process is stabilized, the next step is ensuring the consistency of all input conditions that are not being investigated.
In other words: all potential factors affecting the process that are not part of the DoE matrix must be kept constant during the entire experiment.
This guarantees that any observed differences in results come only from the manipulated factors, and not from uncontrolled background variables.
Practical recommendations for this step include:
Standardizing Materials and Raw Inputs
Secure a batch of materials needed for the experiment from a single, consistent supply.
For example, if you’re injection molding plastic parts or stamping steel sheets, make sure all samples come from the same supplier, production batch, and verified specification.
This eliminates variability in material composition or dimensions, which could otherwise distort results.
If using one batch isn’t possible, at least measure and document key material properties (e.g., chemical composition, hardness) so you can evaluate their potential impact later.
Keeping Machine Settings Constant (Beyond Tested Factors)
Ensure that all machine settings not being studied in the DoE remain unchanged.
For instance, if you’re testing the effect of feed rate and cutting speed on surface roughness, you must always use the same cutting tool, on the same machine, with the same coolant strategy.
All parameters outside the DoE matrix are treated as fixed inputs for the process.
Before starting, it’s a good practice to document all these baseline settings — they become part of the experiment’s reference documentation.
Controlling the Human Factor
As already mentioned, ideally, one experienced operator (or the same production shift) should execute the entire experiment.
If that’s not possible, carefully plan trial scheduling to minimize operator-related variability.
For example:
Divide trials evenly among operators.
Randomize the order of experimental runs to prevent systematic bias from any single operator.
You can also apply blocking — if the experiment must span multiple days and shifts, treat each “day/shift” as a block, ensuring that a full set of factor combinations is run within each block.
Using Checklists and Poka-Yoke for Input Conditions
To ensure that before each trial run the starting conditions are identical, use checklists.
A pre-run checklist should verify all critical points, such as:
Is the machine set to baseline parameters?
Was the material loaded from the correct batch?
Are the sensors properly zeroed?
Ticking off each item before starting a trial minimizes the risk of missing important steps.
Additionally, apply simple mistake-proofing (Poka-Yoke) devices or procedures.
Examples:
Use jigs or fixtures that physically prevent wrong setups.
Implement sensors or interlocks that won’t allow a test to start if critical conditions aren’t met.
These proactive techniques ensure that experimental conditions remain compliant and any mistakes are caught immediately.
In short:
Control everything in the process that is not actively manipulated.
The more uniform the experiment environment, the more clearly you’ll observe the effects of tested factors — without hidden background noise.
Step 4: Ensure Measurement System Reliability and Prepare for Data Collection
Even perfectly executed trials won’t produce valuable insights if the results are not measured correctly and recorded properly.
That’s why the next key area of preparation is metrology and data collection.
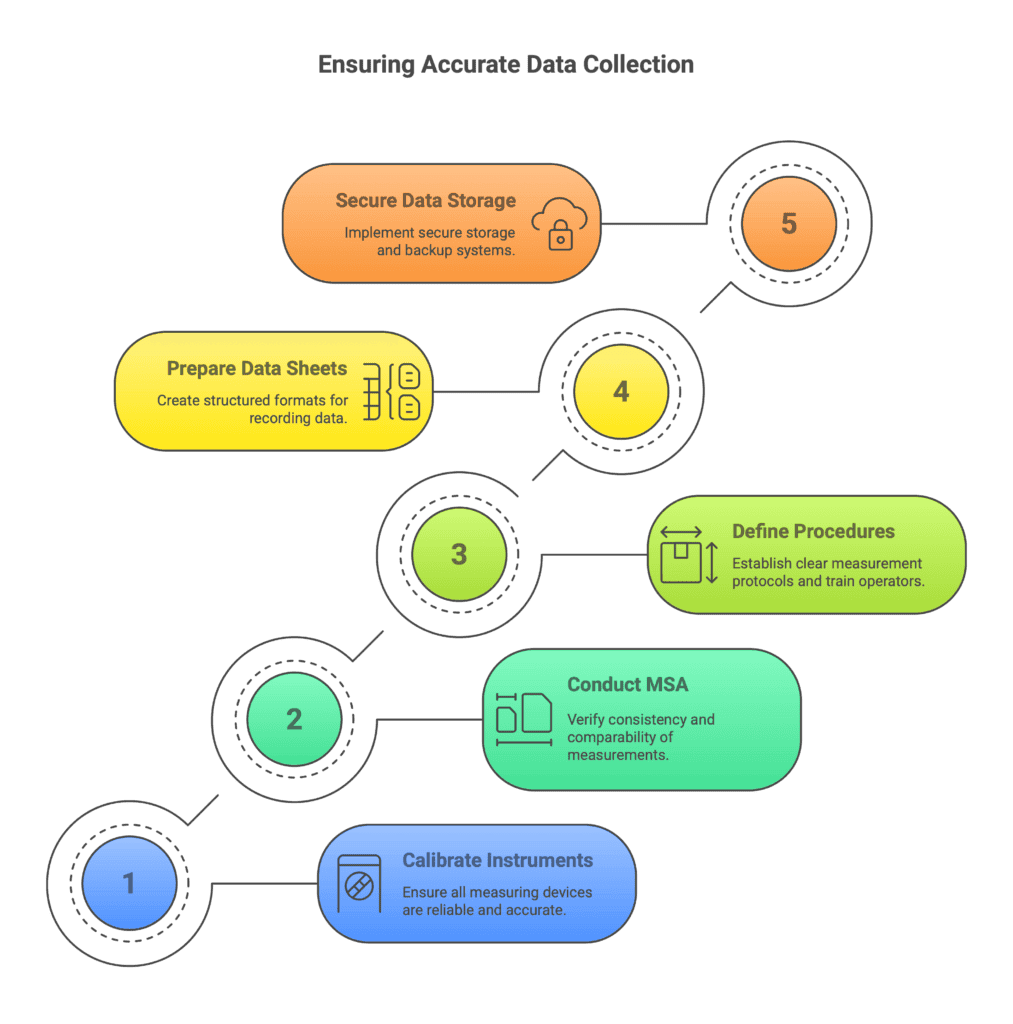
The key elements here are:
Checking and Calibrating Measuring Instruments
All sensors, gauges, scales, calipers, hardness testers, and other devices used to measure results (or critical process conditions) must be reliable.
Check the dates of the latest calibrations.
If calibrations are outdated or close to expiring, recalibrate before starting the experiment.
Make sure the measurement range and resolution are appropriate for the expected process changes.
Even a slightly miscalibrated temperature probe or an unstable air pressure sensor can invalidate an entire DoE.
Measurement System Analysis (MSA)
For critical measurements, it’s highly recommended to perform a Measurement System Analysis (MSA), such as a Gage R&R study (Repeatability and Reproducibility).
This will check whether:
Measurements taken by the same operator are consistent (repeatability).
Measurements between different operators are comparable (reproducibility).
If the measurement error is too large compared to the process variation we want to detect, improvements will be needed — either better equipment or better procedures — before running the DoE.
Defining the Measurement Procedure and Training
Clearly define:
Who will take the measurements.
How they should perform the measurements.
Ensure consistency by providing detailed measurement work instructions.
If manual (human) measurements are involved, train the responsible operators to perform them uniformly — for example, knowing exactly where and how to place a measuring device.
If measurements are automated, double-check that data collection software or programs are correctly set up and working.
Preparing Data Collection Sheets
Before launching the DoE, prepare your data recording format.
This could be a checklist or an Excel spreadsheet containing fields for:
Trial number
Factor settings
Measurement result
Additional observations (optional but valuable)
Alternatively, configure an automatic data acquisition system.
Just make sure nothing is left to memory — record everything systematically and clearly.
Create and stick to a sample identification system (like numbered labels) to avoid confusion later during analysis.
Data Storage and Observations
Decide where collected data will be stored — for example, on a secure network drive.
Also, back up your data daily during the experiment.
Encourage the team to document additional observations for each trial.
Sometimes, casual notes like “sparking was unusually intense during this weld” can explain results during later analysis.
Summary of Step 4:
Reliable measurements are the foundation of trustworthy DoE results.
A good measurement system ensures you won’t have to wonder whether your observed effects are real — because you’ll trust your data.
And well-organized data speeds up the final statistical analysis after the experiment.
Step 5: Final Verification and Trial Run
Before launching the actual experiment, it’s highly recommended to perform a final preparation review — and ideally, a short trial run.
Gather your team and walk through the entire preparation checklist together.
Make sure every single point has been properly completed.
Perform a Small Test Run
Carry out one or two test trials using randomly selected factor settings.
This is your last opportunity to verify:
Are procedures clear and understood by operators?
Is data collection working smoothly?
Is the cycle time as planned?
Are all necessary materials, devices, and documentation ready?
If you notice any discrepancies or issues — this is the perfect moment to fix them without affecting the actual DoE.
Why Trial Runs Are Crucial
A trial run allows you to catch problems that would otherwise surface during real experimentation — when fixing them would be much more costly and risky.
It reduces the risk of:
Misunderstandings among the team
Incomplete data collection
Unexpected machine or tooling problems
Last-minute chaos
After a successful trial run, you can confidently proceed with your planned Design of Experiments — with a much higher chance of success.
Summary and DoE Readiness Checklist
Proper preparation of the process before starting a DoE is just as important as designing the experiment itself.
By ensuring stable, repeatable, and controlled conditions, you eliminate unnecessary variation and make sure your DoE reveals true cause-and-effect relationships instead of random noise.
In real-world manufacturing, the time invested in good preparation translates into real savings — because the experiment produces clear, actionable results right from the first attempt, without the need for costly re-runs or rework.
As the classic rule says:
“It’s better to prevent than to correct.”
Bonus: DoE Readiness Checklist
Here’s a practical readiness checklist you can use before launching your experiment:
✅ Experiment Objective and Plan Defined:
Have you clearly stated the research question, selected input and output variables, and created the experimental matrix?
✅ Process Stability Confirmed:
Is the process under control based on observations or SPC? Have all necessary repairs and adjustments been made?
✅ Equipment Calibrated:
Are all machines and measuring instruments involved in DoE calibrated and verified?
✅ Environmental Conditions Controlled:
Are the production environment conditions stable (temperature, humidity, cleanliness) — or have you planned ways to monitor and block their influence?
✅ Materials from Single Lot:
Have you secured all raw materials from the same lot and verified their consistency?
✅ Nuisance Variables Controlled:
Are all non-experimental factors stabilized and documented (machine settings, tools, software versions, etc.)?
Author: Rafał Sobczak